Building a custom home involves securing financing, purchasing land, hiring a builder, designing your floor plan, obtaining permits, and overseeing construction through foundation to final inspection. The process typically takes 10–16 months and requires careful budget management to avoid cost overruns.
Building a custom home lets you create exactly the living space you've always wanted, from room layouts to finish materials. While the journey requires significant planning and investment, understanding each phase helps you make informed decisions and avoid costly mistakes that derail projects.
Key Takeaways
- Custom home construction typically costs $150–$400+ per square foot depending on location and finishes
- The entire process from land purchase to move-in takes 10–16 months on average
- You'll need 20–25% down payment for construction loans plus reserves for cost overruns
- Hiring an experienced builder before finalizing designs saves time and prevents structural issues
- Permits, inspections, and utility connections add 2–4 months to your timeline
- Design changes during construction can increase costs by 15–30%
Step 1: Establish Your Budget and Secure Financing
Your budget determines every other decision in the custom home building process. Start by calculating your total available funds, including savings, loan approval amounts, and any equity from selling an existing home.
Construction loans typically require 20–25% down payment and have higher interest rates than traditional mortgages during the building phase. Most lenders convert these to standard mortgages once construction completes and you receive your certificate of occupancy.
Break your budget into specific categories:

Always maintain a contingency fund. Unexpected site conditions, material price increases, or design modifications will arise during construction.

Step 2: Find and Purchase the Right Land
Land selection impacts your home's design possibilities, construction costs, and long-term satisfaction. Research zoning regulations, building restrictions, and homeowner association rules before making an offer.
Critical factors to investigate during land evaluation:
- Soil composition and load-bearing capacity (requires geotechnical testing)
- Drainage patterns and flood zone designation
- Access to municipal water, sewer, electricity, and gas lines
- Road access and requirements for driveway construction
- Setback requirements and buildable area limits
- Tree preservation ordinances and clearing restrictions
Lots without existing utility connections can add $15,000–$50,000 to your project budget for well drilling, septic systems, and electrical service installation. Properties requiring significant grading or retaining walls can increase site prep costs by 40–60%.
Request a topographic survey and perc test if the property needs a septic system. These reports reveal potential deal-breakers before you commit to purchase.
Step 3: Assemble Your Building Team
Your builder serves as the project's central coordinator, managing subcontractors, ordering materials, and ensuring work meets code requirements. Interview at least three builders who specialize in custom homes rather than production building.
Essential questions to ask potential builders:
- How many custom homes have you completed in the past three years?
- Can you provide references from recent clients and their project budgets?
- What's your typical timeline from groundbreaking to certificate of occupancy?
- How do you handle change orders and budget modifications?
- What warranties do you provide on structure, systems, and finishes?
- Who will be my primary contact during construction?
Verify licensing, insurance coverage, and check for complaints with your state's contractor licensing board. Request detailed contracts that specify payment schedules, material allowances, and completion timelines.
Your team should also include an architect or designer who translates your vision into buildable plans. Some builders offer in-house design services, while others work with external architects you select.
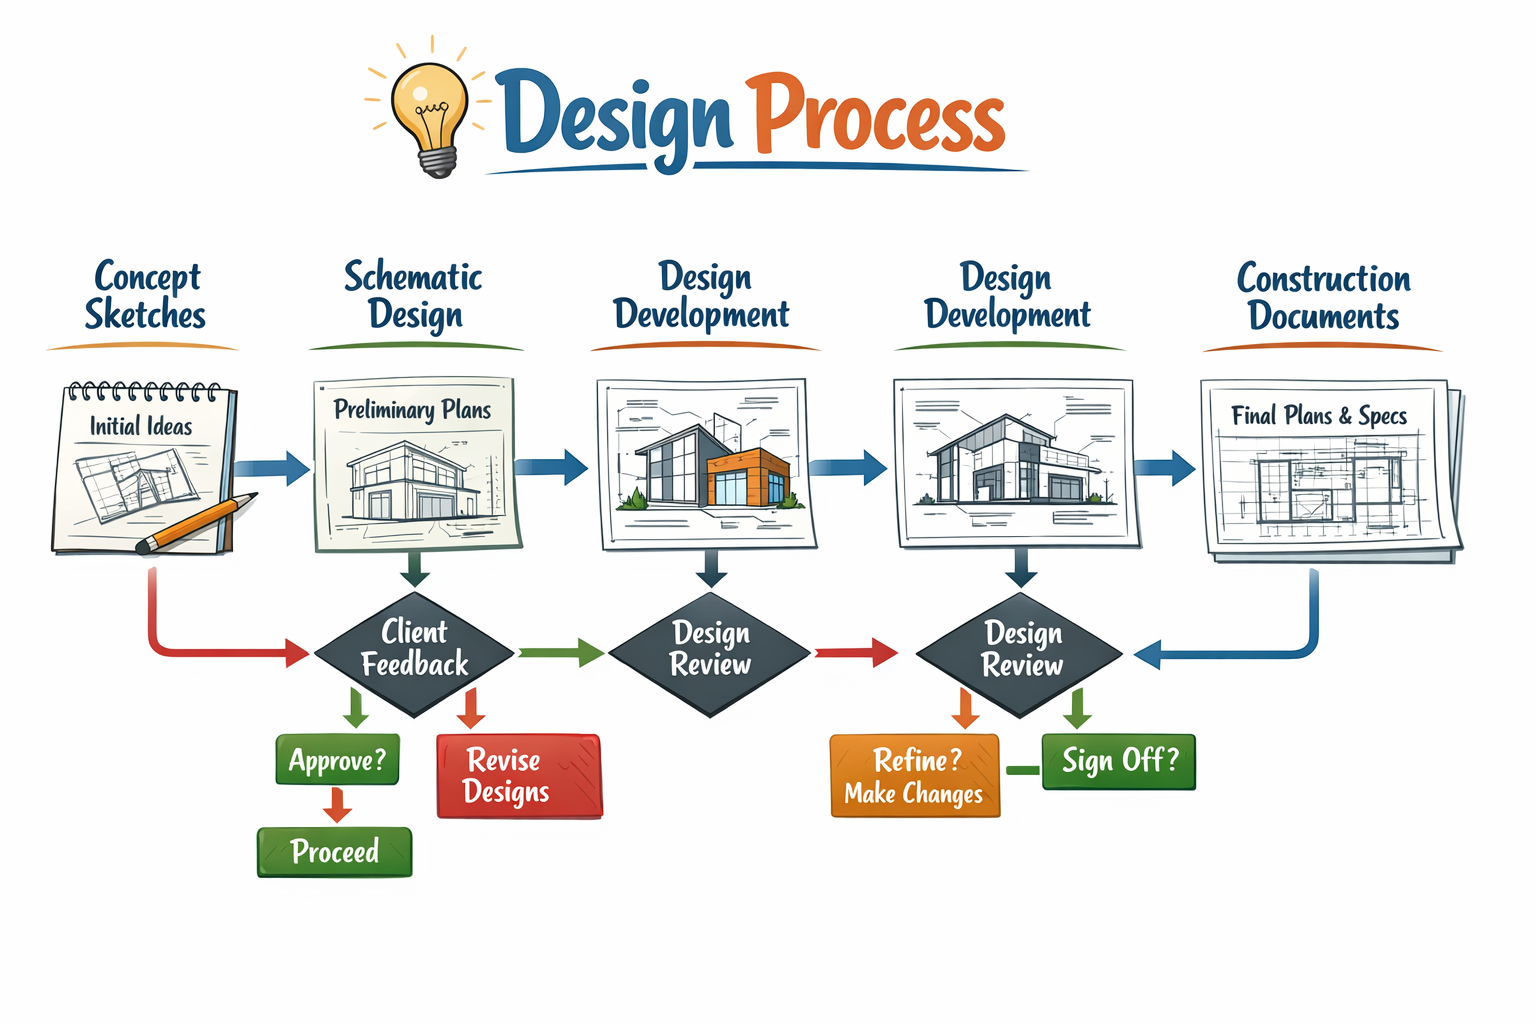
Step 4: Design Your Custom Floor Plan and Select Finishes
Work with your architect to create a floor plan that fits your lot's dimensions, orientation, and topography. Consider how rooms connect, natural light patterns throughout the day, and how spaces will function for your lifestyle.

Make finish selections early. Flooring, cabinets, countertops, fixtures, and tile choices affect both budget and construction schedule. Delayed decisions force crews to skip ahead, creating inefficiencies that increase costs.
Smart homes increasingly incorporate energy-efficient custom homes features like enhanced insulation, high-performance windows, and efficient HVAC systems that reduce long-term operating costs.
Step 5: Obtain Permits and Approvals
Your builder typically handles permit applications, but you're ultimately responsible for ensuring all necessary approvals are in place before construction begins. Requirements vary by jurisdiction but generally include building permits, electrical permits, plumbing permits, and mechanical permits.
The permit process involves:
- Submitting construction documents to the local building department
- Plan review by building officials, which can take 2–6 weeks
- Addressing any required revisions or corrections
- Paying permit fees based on project valuation
- Receiving approved permit documents to display at the job site
Building permit costs typically range from 0.5–2% of total construction value, with additional fees for plan reviews, inspections, and impact fees that support infrastructure. Some municipalities charge $5,000–$15,000 in impact fees for new residential construction.
Don't start any work before permits are issued. Building without permits can result in stop-work orders, fines, and difficulties when selling the property later.
Step 6: Site Preparation and Foundation Work
Once permits are approved, construction begins with site preparation. Crews clear vegetation, establish grades, and prepare the building pad according to engineered plans.
Foundation work follows this sequence:
- Survey crew stakes out the exact building location and elevation
- Excavation contractors dig for basement or crawl space (if applicable)
- Footings are poured and inspected before additional work proceeds
- Foundation walls are formed, reinforced, and poured
- Waterproofing and drainage systems are installed
- Foundation cures for required time period (typically 3–7 days)
- Backfilling and initial grading establish proper drainage patterns
Foundation inspections happen at multiple stages. Inspectors verify footing depth and reinforcement, wall thickness and reinforcement, and waterproofing installation before allowing backfill.
This phase takes 2–4 weeks depending on foundation type, weather conditions, and inspection scheduling. Problems discovered during excavation (unexpected rock, poor soil, high water table) can require design modifications and budget adjustments.
Step 7: Framing and Structural Systems
Framing transforms your floor plans into a three-dimensional structure. Carpenters build floor systems, exterior walls, interior walls, and roof framing according to approved plans.
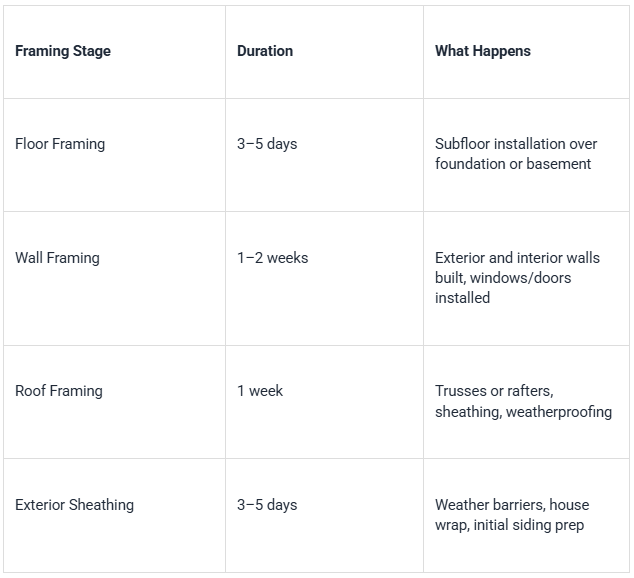
After framing inspection approval, the house gets "dried in" with roofing, windows, and exterior doors. This protects interior work from weather damage as subsequent trades begin their work.
Similar to luxury home renovation projects, framing represents a critical stage where proper execution prevents future structural issues.

Step 8: Rough-In Systems (MEP)
Mechanical, electrical, and plumbing contractors install systems throughout the framed structure before walls are closed. This "rough-in" phase runs wiring, pipes, and ducts to all necessary locations.
Coordinating these trades requires careful scheduling:
- Plumbers install supply lines, drain pipes, and vent stacks
- HVAC contractors run ductwork and install equipment locations
- Electricians pull wire to outlets, switches, and fixtures
- Low-voltage technicians install structured wiring for internet, security, and smart home systems
Each system requires inspection before insulation and drywall cover the work. Inspectors verify proper installation, code compliance, and system functionality.
This phase typically takes 2–3 weeks. Changes to outlet locations, light fixtures, or plumbing fixtures are still relatively easy to accommodate at this stage but become expensive once walls are closed.
Step 9: Insulation and Drywall
After rough-in inspections pass, insulation contractors fill wall cavities, attics, and rim joists to meet energy code requirements. Proper insulation installation dramatically affects your home's comfort and energy efficiency.
Drywall installation follows insulation:
- Sheets are hung on walls and ceilings
- Seams are taped and mudded (typically three coats)
- Surfaces are sanded smooth
- Texture is applied if desired
- Primer coat prepares surfaces for paint
This phase takes 3–4 weeks including drying time between mud coats. Once drywall is complete, your home's room sizes and layouts become clearly visible for the first time.
Step 10: Interior and Exterior Finishes
Finish work transforms the construction site into a livable home. Multiple trades work simultaneously during this phase, requiring careful coordination to prevent conflicts and damage to completed work.
Interior finishes include:
- Paint on walls, ceilings, and trim
- Flooring installation (hardwood, tile, carpet)
- Cabinet and countertop installation
- Interior door hanging and hardware
- Trim carpentry (baseboards, crown molding, window casings)
- Plumbing fixture installation (sinks, toilets, tubs, showers)
- Electrical device installation (outlets, switches, light fixtures)
- Appliance delivery and hookup
Exterior finishes include siding, stone or brick veneer, exterior paint, deck or patio construction, landscaping, and driveway installation.
The finish phase typically represents 30–40% of total construction time despite being only the final quarter of the project timeline. Finish work is detail-intensive and requires sequential completion where one trade must finish before another can begin.
Projects similar to home additions in Charlotte require the same attention to finish detail and coordination that custom homes demand.
Step 11: Final Inspections and Certificate of Occupancy
Before you can move in, the building department conducts a final inspection verifying all work meets code requirements. Inspectors check electrical systems, plumbing systems, HVAC operation, smoke detectors, carbon monoxide detectors, and general construction quality.
Your builder creates a punch list documenting minor items needing correction. These might include paint touch-ups, door adjustments, or fixture replacements. Most builders require punch list completion before releasing final payment.
Once final inspection passes and punch list items are complete, the building department issues a certificate of occupancy. This document legally permits you to live in the home and is required for converting your construction loan to a permanent mortgage.
Common Mistakes to Avoid When Building a Custom Home
- Underestimating your total budget and having no contingency reserve for unexpected costs
- Making frequent design changes during construction, which delays timelines and increases expenses
- Selecting a builder based solely on price rather than experience, references, and communication style
- Failing to research land thoroughly before purchase, missing issues with soil, utilities, or zoning
- Not visiting the job site regularly to monitor progress and address concerns early
- Choosing trendy design elements that will feel dated quickly rather than timeless selections
Many homeowners who complete successful custom builds later tackle whole home remodeling in Charlotte projects using lessons learned from their initial construction experience.
Frequently Asked Questions
Is $500,000 enough to build a house?
Yes, $500,000 can build a quality custom home in most markets, though the size and finish level depend on your location. In moderate cost areas, this budget supports a 2,000–2,500 square foot home with standard to mid-range finishes. Higher cost markets may limit you to 1,500–1,800 square feet. This budget should include land purchase, so if you already own land, your building budget increases proportionally.
Is it cheaper to build or buy a home?
Building typically costs 10–20% more than buying a comparable existing home in the same area, though you get exactly what you want rather than compromising on an existing property. Production homes in developments cost less than custom builds because builders achieve economies of scale. However, building allows you to avoid renovation costs and incorporate modern systems, insulation, and layouts that older homes lack, potentially offering better long-term value.
Is $200,000 enough to build a house?
$200,000 is challenging for custom construction in most markets but possible in low-cost rural areas or if you already own land. This budget might support a smaller home (800–1,200 square feet) with basic finishes if land is excluded. Consider modular or prefab construction, which typically costs 10–20% less than site-built homes. Many builders have minimum project sizes that exceed this budget for custom work.
How big of a house can I build for $100,000?
Building a traditional custom home for $100,000 is extremely difficult unless you own land and act as your own general contractor, which most lenders won't allow. This budget might support a small accessory dwelling unit (400–600 square feet) or tiny home with very basic finishes. Some owner-builders complete small homes at this price point by providing their own labor, but this requires significant construction knowledge and months of personal time investment.
Can I afford a 400k house on 100k salary?
A $100,000 annual income typically supports a $400,000 home purchase, though exact affordability depends on your debt-to-income ratio, down payment size, interest rates, and other monthly obligations. Lenders generally approve mortgages where total housing costs (principal, interest, taxes, insurance) don't exceed 28% of gross monthly income. With $100,000 salary, that's about $2,333 monthly. A $320,000 mortgage at 7% interest would create approximately $2,130 monthly payment before taxes and insurance, leaving room within typical guidelines.
Start Building Your Dream Home
Building a custom home requires substantial planning, but the result is a space designed specifically for how you live. Understanding each phase helps you make informed decisions, maintain realistic expectations, and work effectively with your building team throughout the process.
The key to success lies in thorough preparation, maintaining financial reserves for unexpected costs, and partnering with experienced professionals who prioritize communication and quality workmanship.
Ready to start your custom home journey? Costner Building Group brings decades of experience building custom homes that exceed expectations. Call us at +1 704 236 6502 to discuss your vision and receive a detailed project assessment. We'll guide you through every step from land evaluation to final walkthrough, ensuring your custom home building experience is smooth, transparent, and results in the home you've always imagined.